Step 3 – Product Data Tabs

Last Updated: July 19, 2022

Product Data Tabs are where we enter specific information about the product such as Pricing, UPC, Stock and lots more.

1. General Tab

Product Data General Tab

Below is a list of the fields you'll need to pay attention to, along with a short description of what they are.

Regular Price: Known as MSRP (Manufacturers Suggest Retail Price) This is the full price of the items worth.

Flash Sale Price:
Flash Price will be in the brands Grid. If it’s not there put the lowest sale price given by brand.

UPC: This is the items “Universal Product Code” This is found on the Pricelist usually, if it’s not there make sure to notify a brand manager and they will find it for you.

ITEM#:
Fill this out if applicable (JL Audio/Klipsch)

All other fields in the general tab ignore.
Unless told otherwise from the brand manager.

2. Inventory Tab

Product Data Inventory Tab

Below is a list of the fields you'll need to pay attention to, along with a short description of what they are.

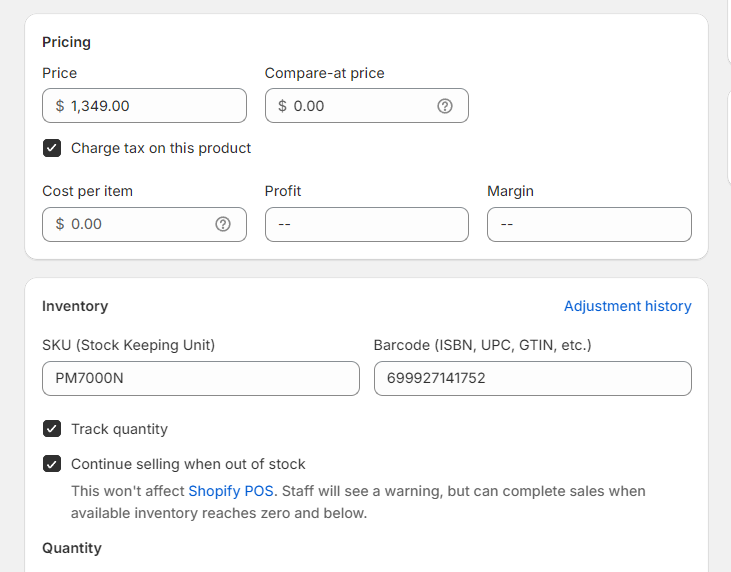
SKU: This will be found on the pricelist or given to you by the brand manager. 
The SKU helps Gibbys identify the product quickly. It’s usually the Model# without spaces or dashes.

The SKU needs to match Fishbowl SKU perfectly in order for the inventory to sync correctly.

No Web Sale: You will only check this if the brand manager tells you to.
If this is checked it will make it so customers cannot buy the item only view it.

Is this a Bundle?: You will only check this if the brand manager tells you to.
If this is checked it will make it so we can filter bundles within quick update.

Manage stock?: This should always be checked.
Having this checked allows us to put in stock.

Stock Quantity:
 The brand manager will tell you what quantity to use.
The normal rule is to put 0 as the stock level and Fishbowl will sync within 30 min. 

Allow Backorders?: If the item is current and re-orderable select Allow, If the item is EOL, Open Box or B-Stock then select Do Not Allow.

Skip Shipping tab.

Skip Linked Products Tab.

3. Attributes Tab

This is one of the most important parts of the entire uploading procedure.
Take your time on this step and make sure the attributes are filled in correctly with all the information.

Product Data Attributes Tab
  1. Make sure the drop down menu is on “Custom Product Attribute” – Click Add
    Custom product attributes means you can fill out the “Name” of the attribute along with the “Value” in text format.
  2. In the Value area Titles don’t need dashes but anything following titles will need a dash
    See below picture on how this area should look.

Make sure to add as much specification information as possible to let our customers make an informed decision.

3. Add in other attributes that go with your product
The attributes you’ll be adding here will match the category you’re product goes in.

Click here to view Attributes Based on Category spreadsheet

The attributes you add in here are actually called “Refining Results” on the front end of the website.

These attributes will allow customers to search for products using them, which is why this area is very important.

Below you can see what refining results are

4. Once you’ve chosen your attributes you’ll have to dig deeper to find out what should go into these attributes.
In the video above I’ve already found what needs to go into my attributes. This part is VERY important. 
TAKE YOUR TIME ON THIS

The attribute called “Specials” should be added when you’re uploading the following

  • B Stock
  • Bundles
  • Open Box

When you add “Specials” attribute
Make sure to uncheck “Visible on the product page

Skip Advanced tab.

4. Frequently Bought Together

This area is for adding products that the customer might like to buy with the product you’re uploading.
In addition to creating upsell opportunites, showing these additional product can help to keep the ivistor engaged with our website. The more engaged a customer is the more apt they are to making a purchase.

Frequently bought products
To insert items click on the empty space and start typing the items name you’d like to put.
Make sure to not always use the same products and switch it up.
MAKE SURE YOU NEVER ADD OPEN BOX OR B STOCK PRODUCTS TO THIS AREA

Select number of products must always be 1 higher than the amount of products you’re going to put in.
If you put 4 products the number must be 5
If you put 3 products the number must be 4

We always want to have a minimum of 3 products in this area.

4. Warranty

This part is for the customer to know what kind of warranty they get with their product.
Warranty

Enter your warranty information in a certain way.
Brand followed by Canada followed by Years followed byLimited Manufacturers Warranty.

EXAMPLE

 Marantz Canada 3 Years Limited Manufacturers Warranty.

Please ensure you have the EXACT warranty coverage that applies to this product.

4. Documents

This is where you’ll need to add any PDF documents that the product has from the manufacturer.

Documents
Make sure you get any PDF available such as “Info sheets” or “Manual”
(English only)

Our goal is to give the customer EVERYTHING on our product pages so they don’t need to find it elsewhere.
Please watch this short video to see how to properly ad a PDF with a link.